You press the button to close your garage door, but nothing happens. You look down and notice a garage door sensor light yellow glowing near the floor. Is this normal? Should you worry?
A yellow sensor light is actually a regular part of how your garage door works. But when your door refuses to close, that same yellow light becomes a warning sign. Something is blocking the safety system.
The good news? Most problems with garage door sensors are easy to fix yourself. You don’t need special tools or technical skills.
This guide will show you exactly what that yellow light means and how to get your door working again in minutes.
Most homeowners can solve these issues without calling a repair service.
What Does a Yellow Garage Door Sensor Light Mean?
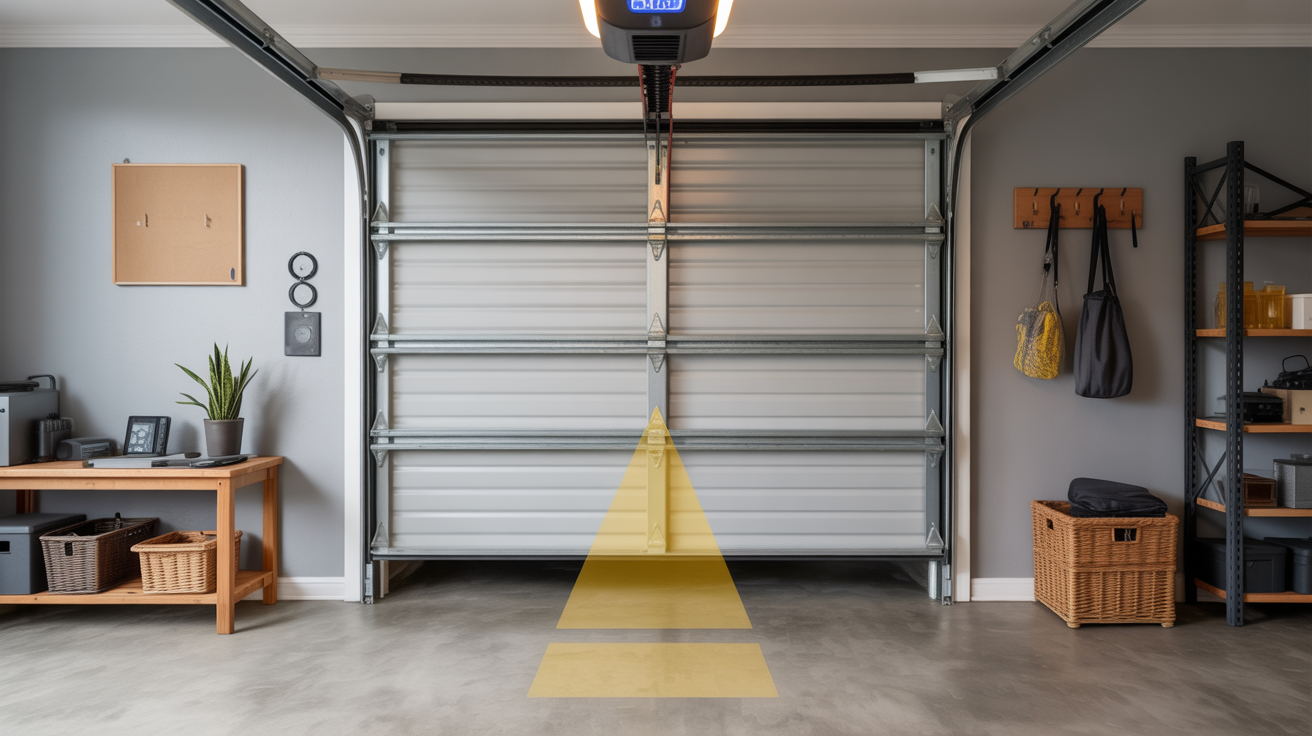
Your garage door has two sensors mounted on each side of the door opening. One sensor sends an invisible infrared beam across to the other sensor. This safety system stops the door from closing if something blocks the path.
The yellow light shows that the sending sensor has power and is transmitting its beam. Under normal conditions, you’ll see a yellow or amber light on one sensor and a green light on the other. This colour difference helps you identify which sensor does what job.
A steady yellow light means everything is working correctly. But a blinking yellow light signals a problem.
When the garage door sensor light turns yellow and starts blinking, the sensors can’t “see” each other properly. The door won’t close because the safety system thinks something is in the way.
Quick Fix Checklist
Before you start taking things apart, try these simple steps first. Many sensor problems come from basic issues that take seconds to fix.
- Look for any items stored near the sensors that might block the beam
- Use a clean, soft cloth to wipe both sensor lenses
- Make sure both sensors point directly at each other
- Close and open your door to test if the problem is fixed
- Check that nothing has bumped the sensor brackets out of place
Try each fix one at a time. Test your door after each step. You might solve the problem faster than you expected.
Common Causes of Yellow Sensor Light Problems
Understanding why your sensors stop working helps you fix them faster. Here are the main reasons your garage door sensor light might turn yellow might cause trouble.
Sensor Misalignment

Your garage door vibrates every time it moves. Over months and years, these vibrations slowly shift the sensor brackets.
Someone might accidentally bump a sensor while moving items in the garage. Kids playing or pets running through can knock sensors out of position.
When sensors don’t face each other perfectly, the infrared beam misses its target. You might see the yellow light steady on one side, but the receiving sensor can’t pick up the signal. The door treats this as a blocked path and refuses to close.
Obstructions in the Beam Path

The sensor beam travels in a straight line about 4 to 6 inches off the ground. This low position makes it easy for things to block the signal.
Dust, dirt, leaves, or spider webs can build up on or near the sensors. A cardboard box placed too close to the wall interrupts the beam.
Even tiny obstructions matter. The infrared beam is precise, and a thin spider web stretched across the sensor lens is enough to trigger the safety system.
During the fall, leaves blow into garages. In winter, snow tracked in on car tyres can pile up near sensors.
Dirty or Foggy Sensor Lenses

Garage sensors sit close to the floor where dust settles. Car exhaust, sawdust from projects, and general dirt coat the sensor lenses over time. In humid climates, moisture creates a foggy film on the lens surface.
When the lens gets dirty, it blocks some of the infrared light. The receiving sensor gets a weak signal or no signal at all.
Your door might work sometimes but fail other times, depending on how much light gets through. Cleaning the lenses often fixes a garage door sensor light yellow problem immediately.
Wiring and Connection Issues

The wires connecting your sensors to the garage door opener can work loose. Temperature changes cause materials to expand and contract.
This movement gradually loosens wire connections. Sometimes wires get pinched by storage items or damaged by pests.
Corroded connections create resistance in the electrical circuit. The sensor might get enough power to light up, but not enough to work properly.
Frayed wires touching each other or metal surfaces can cause short circuits. These electrical problems show up as blinking lights or sensors that work on and off.
Step-by-Step Troubleshooting Guide
Follow these steps in order to fix your sensor problems. Each section builds on the last one.
Step 1: Inspect and Remove Obstructions

Start by looking at the space between your two sensors. Get down at floor level if you need to. Look for anything in the beam path, even if it seems too small to matter.
Spider webs are almost invisible but cause big problems.
Clear away any items stored within a foot of either sensor. Sweep the floor around both sensors. Use a flashlight to check for debris stuck to the sensor housing.
After clearing the area, try closing your door. If it works, you found the problem.
Step 2: Realign Your Sensors

Stand back and look at both sensors from across the garage. They should point directly at each other, forming a straight line. If one tilts up, down, or to the side, you need to adjust it.
Loosen the wing nut or screw holding the sensor bracket. Gently move the sensor until the garage door sensor light on both units glows steadily.
The receiving sensor should show a solid green light when alignment is correct. Hold the sensor in place and tighten the bracket. Make sure the bracket stays firm so the sensor won’t shift again.
Step 3: Clean the Sensor Lenses

Get a microfiber cloth or a soft cotton cloth. Lightly wipe the small lens on the front of each sensor. Don’t press hard or scrub. Gentle circular motions work best.
Never spray cleaner directly on the sensor. If you need moisture, slightly dampen your cloth with water. Avoid using glass cleaner, alcohol, or other chemicals.
These can leave residue that makes the problem worse. Let the lenses dry completely before testing the door.
Step 4: Check Wiring Connections

Look at where the wires connect to the back of each sensor. The terminals should hold the wires firmly. If a wire looks loose, unscrew the terminal slightly, push the wire in fully, and tighten it again.
Follow the wires back to your garage door opener unit. Check those connections too. Look along the wire length for any damage.
Exposed copper wire, cracked insulation, or chewed sections mean you need to replace that wire. If everything looks good, but the garage door sensor light is still yellow, you might have a hidden wire problem inside the wall.
Step 5: Verify Proper Installation Height

Measure the height of each sensor from the garage floor. Both should sit between 4 and 6 inches high. This height meets safety standards and keeps the sensors above most debris.
Use a level to check that both sensors are mounted at the same height. They should also be level horizontally, not tilted.
If one sensor sits higher than the other, loosen the bracket and adjust the position. Matching heights and level mounting help the sensors align correctly.
Preventive Maintenance Tips
Regular care keeps your sensors working smoothly. Set aside a few minutes each month for basic maintenance.
- Wipe sensor lenses with a soft cloth every month
- Check sensor alignment every three months
- Keep at least one foot of clear space around each sensor
- Inspect wiring twice a year for damage or loose connections
- Before winter, clear any leaves or debris from the sensor area
- In spring, check for moisture damage or rust on mounting brackets
A professional inspection once a year catches problems before they stop your door from working. Technicians have tools to test sensor strength and alignment more precisely than you can at home.
When to Call a Professional?
Sometimes DIY fixes don’t solve the problem. If your garage door sensor light, yellow, keeps blinking after you’ve tried every step in this guide, call a repair service.
Electrical problems beyond loose connections need professional tools and knowledge. Working with damaged wires can be dangerous. If you smell burning plastic near your sensors or opener, turn off the power at the breaker and call for help right away.
Sensors eventually wear out and need replacement. A professional can test whether your sensors still work within safe limits. They can also spot problems with your opener unit that affect sensor operation. When safety is involved, professional help is worth the cost.
Conclusion
A garage door sensor light, yellow, is a normal part of your garage door system. When your door stops closing, that same yellow light becomes your first clue about what’s wrong.
Most sensor problems come from simple causes. Dirty lenses, misaligned brackets, or small obstructions account for nearly all issues. You can fix these yourself in less than 30 minutes.
Make sensor cleaning and alignment checks part of your regular home maintenance. Catching small problems early prevents bigger headaches later. A working garage door keeps your home secure and makes daily life more convenient.
If you’ve tried these fixes and your door still won’t work properly, don’t force it. Call a qualified garage door technician. Your garage door is heavy and powerful. When in doubt, let the pros handle it.
Frequently Asked Questions
Should Both Garage Door Sensors Be the Same Colour?
No, they should show different colours. One sensor displays yellow or amber, and the other shows green. The yellow light marks the sending sensor, while the green light shows that the receiving sensor is getting the signal.
Can a Yellow Sensor Light Drain My Garage Door Opener?
Sensor lights use very little power. They won’t drain your opener or increase your electric bill. The lights stay on continuously by design, and this is normal for the safety system to work.
How Long Do Garage Door Sensors Typically Last?
Most sensors last 10 to 15 years with regular maintenance. Extreme temperatures, moisture, and physical damage can shorten their life. If your sensors are over 10 years old and are causing frequent problems, replacement makes sense.
Will My Garage Door Work if One Sensor Is Disconnected?
The door will go up, but won’t come down with sensors disconnected. This safety feature protects people and pets from being hit. Never bypass or disconnect sensors to make your door close. This creates serious safety risks.
Does Sunlight Affect Garage Door Sensor Performance?
Direct sunlight can interfere with the infrared beam, especially during sunrise or sunset. If your door only fails at certain times of day, sunlight might be the cause. Shading the sensors or adjusting their angle slightly can help.